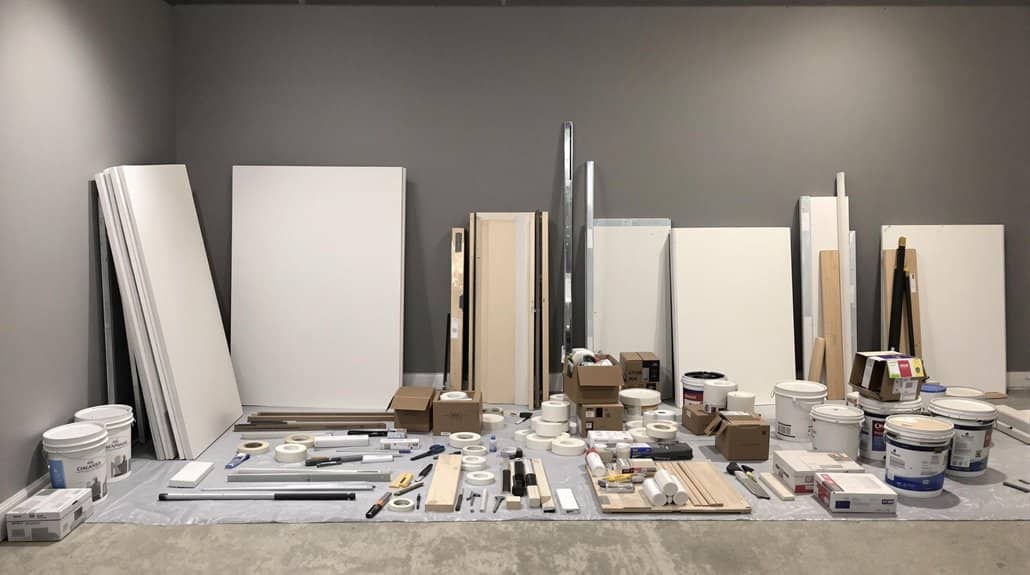
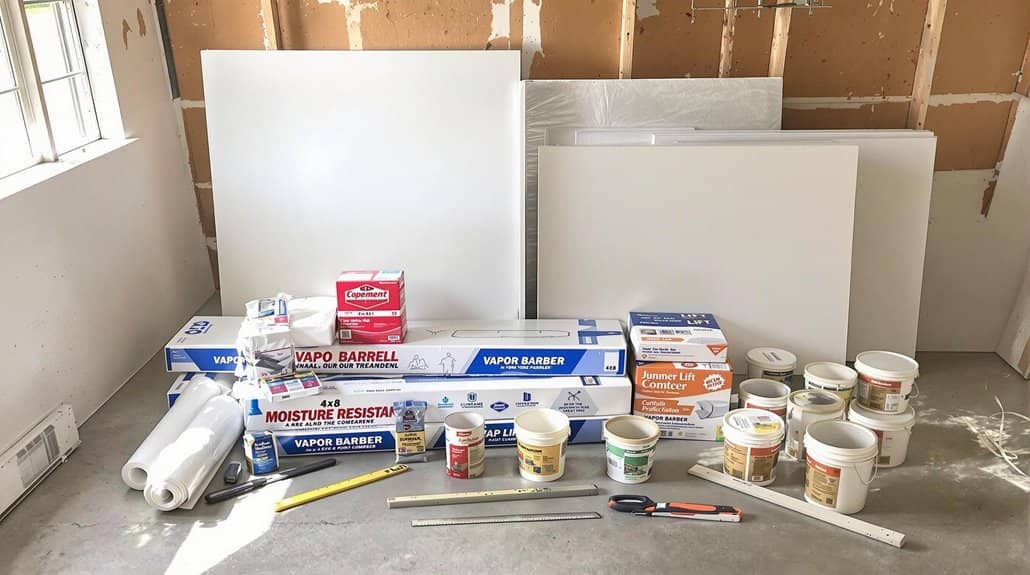
For your basement drywall project, you’ll need moisture-resistant green board panels (1/2″ thick), coarse-thread drywall screws, metal corner beads, and joint compound. Vital tools include a utility knife, T-square, tape measure, and drywall saw. Don’t forget safety gear: dust mask, protective eyewear, and gloves. You’ll also require fiberglass tape, sandpaper, and proper ventilation equipment. The following detailed breakdown will guarantee you don’t miss any critical supplies.
Key Takeaways
- Moisture-resistant green board drywall panels (4′ x 8′ x 1/2″) for basement walls to prevent water damage and mold growth.
- Coarse-thread drywall screws (1-1/4″ to 1-5/8″) spaced 16 inches apart for secure attachment to wood studs.
- Joint compound (premixed or powder) and fiberglass tape for sealing seams and creating smooth wall transitions.
- Basic tools including utility knife, T-square, tape measure, and drywall saw for precise cutting and fitting.
- Safety equipment including dust mask, protective eyewear, gloves, and proper ventilation setup for safe installation.
Essential Drywall Panels and Sheet Supplies

When planning your basement drywall installation, you’ll need to select the appropriate panels based on your specific requirements and local building codes. Start with standard 4′ x 8′ drywall panels at 1/2″ thickness for your walls, but consider upgrading to moisture-resistant drywall in areas where humidity might be a concern, such as near water heaters or laundry facilities. Green board drywall provides basic moisture protection for most basement applications. You’ll want to install drywall that meets fire-rating requirements, particularly around utility areas. For shared spaces or entertainment rooms, consider soundproof panels to minimize noise transmission. Don’t forget crucial supplies like drywall screws and compound for proper installation. If you’re tackling this as a DIY project, lightweight panels can make the job more manageable while still maintaining structural integrity. Remember to check your local building codes for specific requirements regarding panel types and fire ratings.
Fasteners and Mounting Hardware
Selecting the right fasteners and mounting hardware stands as a crucial foundation for proper drywall installation. You’ll need specific screws depending on your stud material, and proper corner protection to guarantee a professional finish around electrical outlets and corners.
| Hardware Type | Application | Spacing |
|---|---|---|
| Coarse-Thread Screws | Wood Studs | 16″ Walls/12″ Ceilings |
| Fine-Thread Screws | Metal Studs | 16″ Walls/12″ Ceilings |
| Metal Corner Bead | Outside Corners | 9″ Between Nails |
| Fiberglass Tape | Seams/Joints | Continuous Coverage |
When securing drywall sheets, you’ll want to use 1-1/4″ to 1-5/8″ screws for maximum hold. While nails can work, they’re more prone to popping over time. For reinforced joints, opt for fiberglass tape before applying joint compound, particularly in high-stress areas of your basement installation. Working with experienced contractors can ensure proper installation techniques and prevent costly repairs down the line.
Joint Compounds and Taping Materials

After securing your drywall panels with the proper fasteners, you’ll need the right joint compounds and taping materials to create a professional finish. Choose between powder, premixed, or hot mix compounds based on your project’s timing and requirements. You’ll use your drywall knife to apply these materials in multiple coats, ensuring each layer dries completely before proceeding.
For ideal results, follow these crucial steps:
- Apply a thin base coat of joint compound along seams
- Embed your choice of paper tape or fiberglass tape, pressing firmly to eliminate air bubbles
- Feather subsequent coats outward, extending each layer slightly wider than the previous
Remember to sand between coats using fine-grit sandpaper and prime the surface before painting to achieve that seamless, professional-grade finish you’re aiming for. Consider installing metal framing first to ensure your walls maintain proper flatness and squareness during the finishing process.
Cutting and Measurement Tools
Three vital cutting and measurement tools form the foundation of any successful drywall installation project: a tape measure, T-square, and utility knife. You’ll need the tape measure for precise wall measurements, guaranteeing your drywall sheets fit perfectly against studs and joists. The T-square becomes your guide for marking straight lines, enabling accurate cuts that create professional-looking results.
Your utility knife will be fundamental for scoring and snapping drywall sheets, while a drywall saw handles intricate cuts around outlets and fixtures. Don’t forget to include a drywall calculator in your toolkit – it’ll help you determine exactly how many sheets you’ll need by factoring in your basement’s dimensions and potential waste. These cutting and measurement tools working together will assure your basement drywall installation meets industry standards and looks polished.
Safety Equipment and Protective Gear
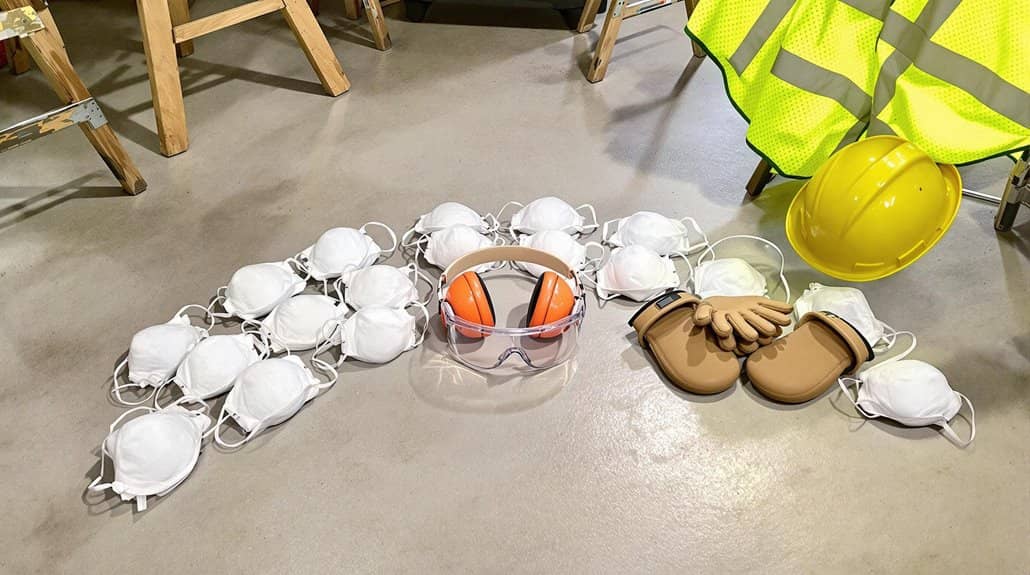
Proper safety equipment stands as your primary line of defense during basement drywall installation. When you’re working in a confined basement space, it’s essential to protect yourself from potential hazards with the right protective gear. Your safety equipment checklist should include protective eyewear to shield against flying debris, a dust mask or respirator for breathing protection, and sturdy gloves to prevent hand injuries.
For ideal protection during your installation project:
- Wear knee pads to maintain comfort and prevent injury during floor-level work
- Use ANSI-approved protective eyewear that fully covers your eye area
- Select a proper-fitting dust mask or respirator rated for drywall particulates
Remember to maintain proper ventilation by setting up fans or opening windows, especially when working with joint compounds and adhesives in your basement workspace.
Surface Finishing and Treatment Supplies
Fundamental surface finishing and treatment supplies form the foundation of a professional-looking drywall installation. You’ll need joint compound, available in both premixed and powder formulations, to fill seams and embed tape between drywall panels. When selecting sanding tools, opt for fine-grit sandpaper or sanding blocks to achieve that smooth, seamless finish after the compound dries.
Don’t overlook the importance of corner beads for your outside corners; they’ll provide crucial protection and create crisp, clean edges that resist damage. Before painting, you’ll want to apply a high-quality primer to guarantee proper paint adhesion and uniform coverage. For added visual interest, consider using texture sprays or specialized applicators to create distinctive patterns on your surfaces, elevating your basement’s aesthetic appeal beyond basic flat walls. Feathering the edges of each compound coat helps create flawlessly smooth joints that disappear into the wall surface.
Specialty Equipment for Basement Installation
Professional basement drywall installation demands specialized equipment that streamlines the process and guarantees precise results. You’ll need a drywall lift to safely position panels overhead while maintaining perfect alignment. A quality utility knife and cordless drill with a screw gun attachment are crucial for clean cuts and proper fastening of drywall screws.
To achieve professional-grade results in your basement project, prioritize these critical tools:
- T-square for accurate measurements and perfectly straight cuts across drywall panels
- Spiral saw for precise outlet and window cutouts that won’t compromise panel integrity
- Utility knife with retractable blade for scoring and trimming edges with contractor-level precision
These specialized tools transform challenging basement installations into manageable projects, ensuring you’ll achieve results that match industry standards.
Frequently Asked Questions
What Supplies Do I Need to Put up Drywall?
You’ll need 1/2″ or 5/8″ drywall panels, coarse-thread screws, joint compound, paper or fiberglass tape, a utility knife, T-square, drywall lift, and sanding tools for proper installation and finishing.
What Materials Are Needed to Make a Drywall?
You’ll need gypsum powder, heavy paper sheets, water, and specialized additives depending on your needs – whether it’s for moisture resistance, fire protection, or soundproofing. The manufacturing process requires industrial-scale heating and drying equipment.
What Is Involved in Drywall Installation?
You’ll need to start by measuring and cutting drywall sheets precisely, securing them to studs with screws, then applying tape and joint compound. Remember to sand between coats for a professional finish.
What Drywall Should Be Used in a Basement?
You’ll want moisture-resistant (green board) drywall for your basement walls, combined with proper insulation. Consider fire-rated panels near utilities and soundproof options for entertainment areas. These choices guarantee ideal moisture protection and safety.
Conclusion
You’ll need to carefully inventory your materials before starting the basement drywall project. Double-check quantities of panels, fasteners, joint compounds, and specialty moisture barriers against your square footage calculations. Don’t forget to account for waste factors and supplementary supplies for inevitable adjustments. With proper planning and all materials on-site, you’ll maintain workflow efficiency and minimize costly mid-project supply runs.