Before removing a popcorn ceiling, you’ll need to test for asbestos, especially in homes built before 1980. Protect yourself with safety gear and prepare the room by covering floors and walls with plastic sheeting. You’ll need basic tools like a ladder, garden sprayer, and drywall knife to wet and scrape the surface. Proper ventilation and HVAC shutdown are vital for dust control. Understanding the complete removal process will help guarantee a successful DIY project.
Key Takeaways
- Test for asbestos before starting any removal work, as ceilings installed before 1980 may contain harmful fibers.
- Prepare the room by covering floors and furniture with plastic sheeting and ensuring proper ventilation.
- Spray small sections of ceiling with warm water to soften the texture before scraping with a drywall knife.
- Expect significant mess during removal, requiring thorough protection of surrounding areas and proper disposal methods.
- Plan for post-removal repairs and finishing work, including joint compound application, sanding, and painting.
Why Your Home May Have a Popcorn Ceiling

While modern homeowners often view popcorn ceilings as an outdated eyesore, these textured surfaces served significant practical purposes when they gained widespread adoption in mid-20th century construction. Builders favored this cost-effective finish because it efficiently concealed ceiling imperfections and provided sound dampening benefits throughout your home. For thorough removal, professionals use drywall taping knives and garden sprayers to soften and scrape away the textured material. If your home was built before the 1980s, your popcorn ceilings may contain asbestos, creating a potential health hazard for you and your family. Before considering removing popcorn ceilings as a DIY project, it’s essential to have an asbestos test performed by qualified professionals. Many homeowners are choosing to modernize their spaces by replacing these dated textures with smooth finishes, which can improve lighting conditions and create a more contemporary aesthetic that aligns with current design trends.
Essential Safety Measures and Asbestos Testing
Before undertaking any popcorn ceiling removal project, you must determine whether asbestos fibers are present in your ceiling material through proper testing procedures. Since homes built before the 1980s commonly contain 1-20% asbestos in their popcorn ceilings, you’ll need to use an EPA-approved testing kit or hire certified specialists to analyze samples.
If you’re proceeding with removal, protect yourself by following these crucial safety steps:
- Wear proper personal protective equipment, including safety glasses, dust masks, and disposable gloves
- Avoid scraping or disturbing the ceiling material until testing confirms it’s asbestos-free
- Contact certified abatement contractors immediately if testing reveals hazardous fibers
Tools and Materials Checklist
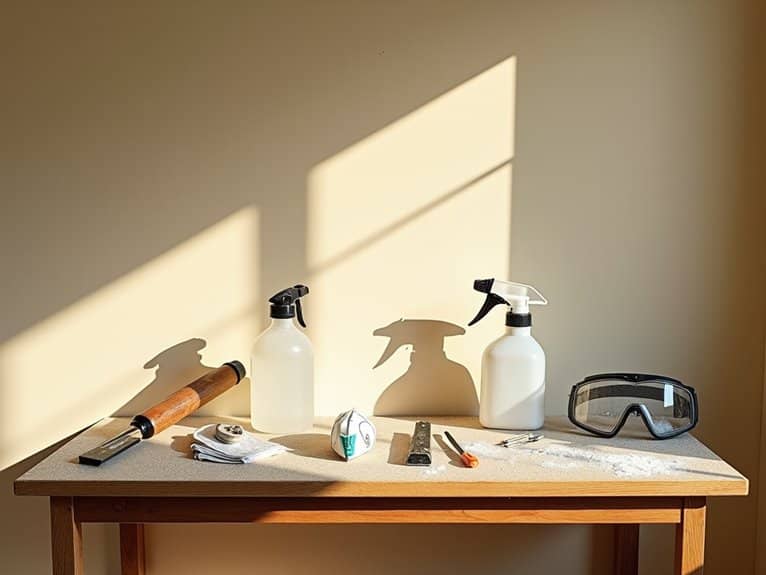
Once you’ve confirmed your ceiling is asbestos-free and implemented safety protocols, gathering the right tools and materials becomes your next priority. You’ll need a reliable ladder and a garden sprayer to wet the ceiling surface effectively. A wide putty knife or drywall taping knife will be your primary scraping tool.
Don’t skip on protection – secure plastic sheeting and painter’s tape to cover your floors and furniture. You’ll also want waterproof drop cloths to contain the mess. For your safety, make certain you’ve got proper PPE: a respirator, safety goggles, and protective gloves. After removing the popcorn texture, you’ll need joint compound and sandpaper to achieve a smooth finish. Having all these materials ready before you start will guarantee a more efficient and safer removal process.
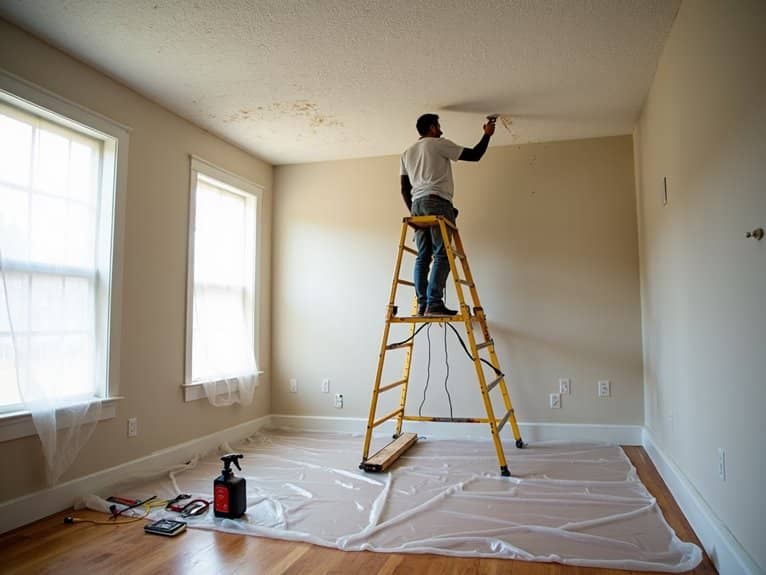
Room Preparation and Surface Protection
Proper room preparation creates the foundation for a successful popcorn ceiling removal project. You’ll want to start by removing all movable furniture and protecting fixed items with waterproof tarps. Secure plastic sheeting along walls and floors using painter’s tape to catch debris and make cleanup easier.
Before you begin, follow these critical steps for ideal surface protection:
- Turn off your HVAC system to prevent dust from circulating throughout your home
- Open windows and doors to establish proper ventilation for a safer working environment
- Inspect your ceiling for existing damage that might need attention after removal
This thorough room preparation approach not only protects your belongings but also creates a safer, more efficient workspace. Remember to pay special attention to sealing off adjacent rooms to contain dust and debris within your work area.
Step-by-Step Removal Techniques
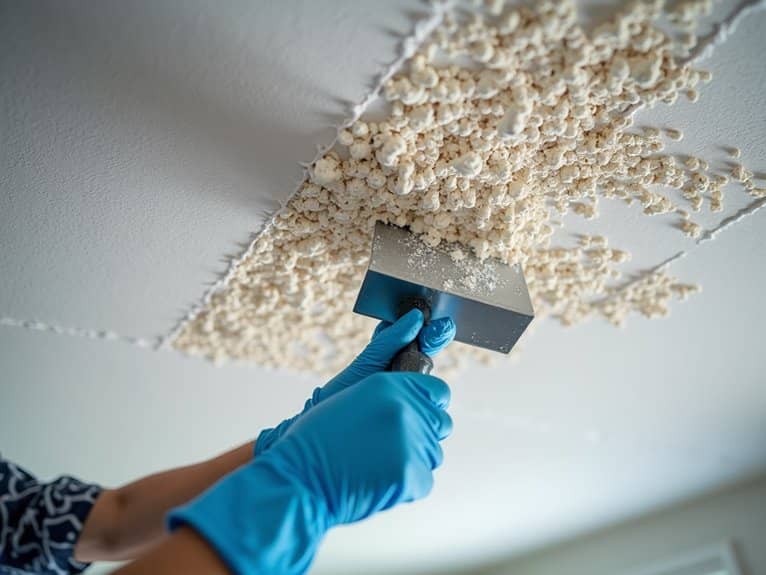
With your workspace safely prepared, the systematic removal of popcorn texture requires careful attention to technique and timing. You’ll want to work in small sections, starting with a 4×4 ft area. Using your garden sprayer, apply warm water to the ceiling and let it absorb for 15 minutes. This moisture helps the texture release more easily during the popcorn ceiling removal process.
Hold your drywall knife at a low angle and carefully scrape away the softened material, being mindful of falling debris. As you progress, inspect the ceiling for any damage to the underlying surface. Once you’ve completed the removal, patch imperfections with joint compound and sand until smooth. Remember to maintain consistent pressure while scraping to avoid gouging the drywall. This methodical approach guarantees the best results for your ceiling renovation project.
Ceiling Repair and Surface Finishing
After successfully removing the popcorn texture, a thorough inspection and repair phase guarantees your ceiling achieves a professional finish. Start by applying joint compound to fill any cracks or holes in your drywall surfaces. Once dried, sand the area until it’s uniformly smooth, confirming proper paint adhesion. Professional drywall services can help avoid costly mistakes and ensure the highest quality results.
For best results, follow these crucial steps:
- Apply a specialized drywall primer like Kilz to seal repaired areas
- Use high-quality, low-VOC ceiling paint for better air quality
- Finish by applying silicone caulk where the ceiling meets walls
Your ceiling repair project requires attention to detail and proper technique. Keep in mind each step builds upon the previous one, from initial patching to the final coat of paint. This methodical approach guarantees you’ll achieve the smooth, modern ceiling finish you’re working toward.
Time Management and Project Planning
Now that your ceiling surface is prepared, let’s focus on creating an efficient timeline for your popcorn ceiling removal project. For every 500 square feet, you’ll need approximately 20 hours of dedicated work time. Begin by measuring your ceiling’s total area to create an accurate project schedule.
Your time management plan should include several key phases. Set aside one full day for the removal process, which involves wetting and scraping the popcorn texture. You’ll need an extra 2-3 hours for priming and painting, plus adequate drying time between coats. Don’t forget to allocate about 2 hours for cleanup and workspace restoration. When planning this home improvement project, choose a timeframe when the room won’t be needed, as you’ll want uninterrupted access to complete each phase properly.
Frequently Asked Questions
How Do I Prepare My House for Popcorn Ceiling Removal?
You’ll need to clear rooms, cover furniture, seal vents, and guarantee proper safety precautions. Test for asbestos, gather removal tools, and plan your project timeline. Don’t forget dust control measures for efficient debris disposal.
How to Prep a Ceiling After Removing Popcorn?
After sanding and patching drywall repairs, you’ll need to thoroughly clean the ceiling, apply a high-quality primer, and choose your desired texture option before painting. Don’t forget to take into account lighting impacts during preparation.
What to Wear When Removing a Popcorn Ceiling?
You’ll need protective gear: a high-quality face mask, safety goggles, and long-sleeved clothing layers. Don’t forget durable work gloves and a hard hat. Guarantee proper ventilation while you’re removing the ceiling.
Do I Need to Skim Coat After Removing Popcorn Ceiling?
Yes, you’ll need to skim coat after popcorn removal to achieve a smooth finish. While DIY skim coating is possible, the technique requires patience and skill. Professional skim coating often delivers the best ceiling texture results.
Conclusion
Removing your popcorn ceiling requires careful planning and strict safety protocols. You’ll need to wear appropriate PPE, conduct asbestos testing, and properly protect all surfaces before beginning. Once you’ve completed the scraping process, don’t rush the repair phase – proper ceiling preparation and finishing are essential for professional results. With methodical execution and attention to safety requirements, you can successfully transform your dated ceiling texture.